Many Featherweight owners send us their original Foot Controllers for rewiring. We offer this service for those who want to keep their Original Foot Controller and Bakelite plug but want it to be electrically safe. The video above demonstrates the process of rewiring an original Singer foot controller, plus, we now carry a kit including all the rewiring parts so that you can perform this DIY "do-it-yourself" repair at home.
Below are a few pictures and instructions from the video above. However, be sure to watch the video tutorial all the way through for the most thorough demonstration of the rewiring process.
This rewiring process maintains the original Foot Controller and original Bakelite plug while replacing the electric cord that goes to the outlet and the cord that goes to the foot controller.
Original Bakelite Plug
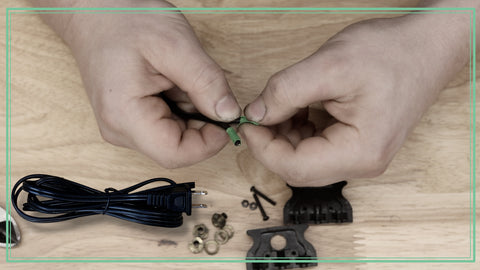
First, replace the wires that go to the Terminal Plug. Unscrew both screws on the plug. Inside are the three round contact pins with the wires screwed down by a brass nut on each pin. Unscrew all three nuts and set them aside. Use pliers to loosen the nuts if needed.
Next, cut the old wires below the knot and slide them out of the Bakelite plug. Discard the old wiring. Feed the blank ends of each cord included in the kit through the hole in the plug and split each cord in half, two and a half inches back. There is a special knot to tie that allows all four wires to fit in the plug and ensures that the wires will not pull through the hole in the plug housing - Watch the video for instructions on tying the knot.
It is helpful to put an identifying piece of tape on the two ends of the electric cord that goes to the foot controller, so it doesn't get confused with the cord going to the wall.
Now we're going to place all four wires in the correct slots and strip the wires back. The taped wire in the knot belongs at the far right end of the plug. The untaped wire in the knot goes into the middle position in the plug. The final two wires will both occupy the far-left position in the plug. Snip off the wires so they are all extending about 1" from the edge of the plug. Remember to designate the wires as you strip them.
First, strip the wires for the far-left position and twist them together.
Notice there is a little groove in each of the threaded brass pins. Lay the twisted wire in the groove and wrap the wire around the threads one time. Snip off the excess wire then screw the nut into place, securing the wire. Seat the pin into the plug.
Repeat this with the middle wire and the far-right wires.
Once all three pins are wired and seated into the plug, replace the top half of the plug and screw the two halves back together again.
Next, wire up the foot controller. This is the ideal time to replace old, worn-out foot controller feet with a new set of our rubber foot controller cushions.
Remove the four screws from the bottom of the foot controller feet and remove the cover.
If your foot controller is the earlier metal style, then different cushions are required to push on. These earlier style cushions are available here.
There are two wires inside. Unscrew the two wires and blow/wipe out debris and dust.. Install two new spacers on each screw hole, and attach either of the wires to one of the posts. Then tighten the screw on each wire lead.
Put the cover in place, ensuring the cord comes smoothly out the back. Replace the four screws, and you're done.
This repair is a rewarding accomplishment, but the tedious nature of wiring those four wires inside the plug can certainly be a challenge. If you get stuck - even if you are halfway through the rewiring process, you can send us the controller as is, and one of our technicians will be able to bring this task across the finish line for you via our Foot Controller Rewiring Service.


 Singer Featherweight Foot Controller Rewiring