Christmas is such a wonderful time of year at the Featherweight Shop! There are so many things to do and prepare that it feels like we are working in Santa’s Shop and we are his elves!
Products Used:
Swell & Sweet Christmas Fabric Panel - 24" x 44"
Glass Head Pins, Blue Super Fine
Rotary Cutter, Deluxe Ergonomic - 45 mm
Wonder Clips, LARGE BAG of 100 ct. – Red
Aurifil Thread 50wt Cotton - 1300 Meter Spool
3/4" Inch RIC RAC by Riley Blake - BLACK (sold by the yard)
Scissors, Thread Snips
Hand Crank Pinker
Toweling
Nifty Needles for Binding - Color-Coded, by Lori Holt
Hannah (who recently joined the Shipping and Customer Service team) was learning more about Featherweights by doing some simple hemming of the special-themed Toweling we carry. There are many different styles in the store to choose from, and Hannah chose several that had pretty Christmas designs.
These would be such a quick gift idea! Sew a simple hem on both cut ends of each toweling piece, iron to get any wrinkles out, and poof!...Christmas gifts! Make napkins, hand towels, table or piano runners or even curtain valances! The length is already presewn, so one only has to stitch the narrow ends - so easy!


So, let's get sewing!
Next up to sew was the Santa Claus panel, have you seen it!? His sweet jolly face is so friendly that I decided to make pillows to decorate for the holidays.

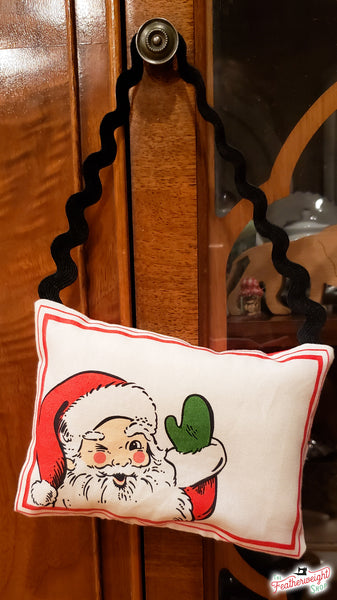
I began with sewing one of the smallest Santa post card size prints (quilt labels) into a doorknob pillow. I sewed right sides together and added ric rac for a hanger, filled it with batting, and sewed the opening closed. Perfect!
Next was to make two small pillows. I cut both of the smaller Santa pieces, as well as a back piece of coordinating fabric to measure 12-inches square. I sewed a 1/4" seam all the way around, leaving a small-ish opening (6-8 inches) on one side to insert a 12-inch pillow form.

Because these were just quick accent pillows, I stuffed both of them with their pillow forms and hand-sewed the openings closed.

12-inch square decor pillows
Now, to sew the Giant Santa Pillow 🎅! For the backing of the large pillow, I decided overlapping envelope-style back pieces would work best, and cut two 18” x 24” rectangles of coordinating Christmas fabric. On one long side of each back piece, I pressed and sewed a half-inch hem.
Then, with right sides facing out, I overlapped one back piece over the other and aligned the backing pieces together to match the raw edges of the cut 24" square Santa cover panel front (wrong sides together).
The hemmed edges of the back pieces should overlap as shown in the photo above. Later, this will be the finished opening to insert the pillow into the cover.
Next, I pinned the backing pieces in place to the Santa Claus cover panel and basted 1/4” around all four sides. (REMINDER: Santa and backing pieces are basted together with right sides facing out.)
I then cut three 2 ½“ x WOF (Width Of Fabric) binding strips and sewed them together, end to end at 45-degree angles, to make one long strip.
Folding the binding strip in half lengthwise, I pressed the wrong sides together to have my binding all prepared to sew on the pillow cover.

Using the machine, I sewed the folded binding strip to the pillowcase front with raw edges matching, making sure to miter the corners as I sewed all four sides.

My threads snip so easily using the Thread Cutterz mounted to the faceplate on my Singer Featherweight.
I joined the final ends together, just like I would a quilt, using this method.
To finish, I folded the binding over to the back side of the pillow and ironed it to give me a guide to help keep my hand binding even.
After hand binding, I inserted a 24" pillow form through the back overlap and voila! A Giant Santa Pillow was ready for the grandchildren to enjoy when they come for Christmas!


Now that the Giant Santa pillow was sewn, as well as the two smaller pillows and a little stuffed door hanger, I was determined to use the entire panel! I pinked the two small Santa rectangle pieces and attached each one to card stock. Then added a couple extra touches for a gift tag and a Merry Christmas card!


These easy projects were so fun and jolly! We even made kits for the Giant Santa Pillow & panel set so you could easily join the festive cheer with us! So, grab a quick kit, turn on a Christmas movie or listen to some Christmas music, sew a Santa Claus pillow and say Ho! Ho! Ho!
Merry Christmas!

Addendum: We were having so much fun with these Giant Santa panels, we even made a standard-sized pillow case following this tutorial. We added snap-on grommets and a cotton rope (both found on Amazon) and made a Santa Sack! This makes the perfect gift bag for the awkward shaped present or collection of goodies to bag up together.... or grab several gifts to take to a party!


We hope this blog has inspired you with all sorts of ideas on what you can do, too! 🎄 🎅


 Swell and Sweet Christmas Santa Pillow and Toweling