Is your machine skipping stitches, or looping strangely after it was sewing just perfectly moments before? Most all stitch problems on a Singer Featherweight have to do with the way it is threaded. Unlike most modern machines and even a few older Singer models, the Featherweight 221 & 222K needle needs to face a certain direction, the thread gets inserted opposite of norm and the bobbin is counterclockwise. If I didn’t know any better I’d say everything is backward! Nevertheless, follow this tutorial and you’ll have perfect stitches in a matter of a few minutes. So, if your machine is already threaded, take it all out and let’s begin again……
First, let’s start with the Bobbin and Bobbin Case:
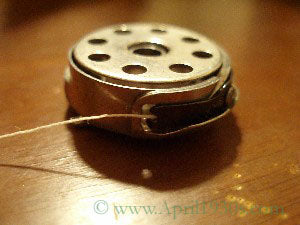
Hold the bobbin between the thumb and forefinger of the right hand, with the thread on top drawing from right to left, as shown in Fig. 1.
Fig. 1
With the left hand holding the bobbin case as shown in Fig. 1, the slot in the edge being at the top, place the bobbin into the bobbin case as shown in Figure 2.
Figure 2
Figure 3
Then pull the thread into the slot as shown in Fig. 2, and back under the tension spring into the slot at the end of the tension spring as shown in Fig. 3.
Figure 4
Turn the balance wheel over toward you until the thread take-up lever (6) is raised to its highest position. Place the spool of thread on the spool pin at the top of the machine; pass the thread through the thread guide (1) at the left, down, under and from the right to the left between the tension discs (2). Hold the spool tightly with the right hand and with the left hand pull the thread up under the thread take-up spring (4) until it enters the retaining fork (3), then pass the thread up and back of the wire thread guide (5) and from the right to the left through the hole (6) in the end of the thread take-up lever, down into the eyelet (7), at the side of the face plate, into the lower wire thread guide (8), into the guide (9) in the needle clamp, then from right to left through the eye of the needle (10). Draw about two inches of thread through the eye of the needle with which to commence sewing.
To Replace the Bobbin Case
After threading, take the bobbin case by the latch, holding it between the thumb and forefinger of the left hand.
Fig. 5 Bobbin Case Threaded and Replaced
Place the bobbin case on the center stud (A, Fig. 5) of the bobbin case base with the thread drawing from the top of the bobbin case.
Release the latch and press the bobbin case back until the latch catches the groove near the end of the stud. Allow about three inches of thread to hang free from the bobbin case and turn down the bed extension.
CAUTION — In case the throat plate is removed for cleaning the stitch-forming mechanism, etc., make certain, when replacing the throat plate, that the position finger (A2, Fig. 5) of the bobbin case base enters the notch (B2, Fig. 5) of the position plate attached to the underside of the throat plate.
To Set the Needle
Turn the balance wheel over toward you until the needle bar is at its highest position, and loosen the thumb screw (A Fig. 6) in the needle clamp.
Figure 6. Positioning of Needle in Needle Clamp
Have the flat side of the shank of the needle toward the left as shown above and put the needle up into the clamp as far as it will go. Then tighten the thumb screw.
Threading the Machine
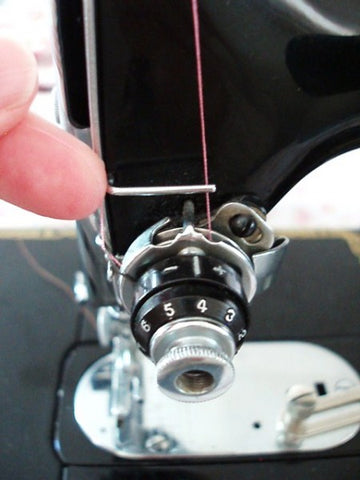
Pull the thread from the spool and catch it on the thread guide then take it straight down into the tension unit being sure to catch it between the tension discs.
Going clockwise, wind it around the tension unit until you get to the take-up spring.
Resting the thread on your left index finger, pulling it taut, lift it up and over the spring wire to catch it on the retaining fork.
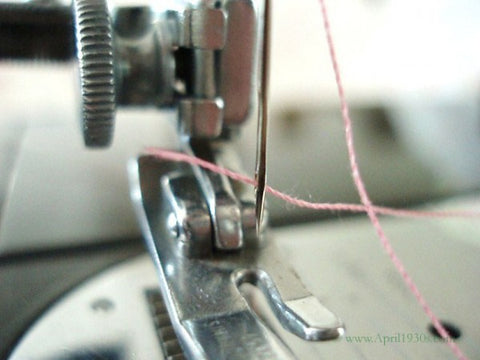
Hook the thread around the back of the wire thread guide and go up to the hole of the thread take-up. Thread it from the right to the left.
Pass the thread down through the eyelet on the side of the face plate into the lower wire thread guide and then into the guide in the needle clamp. See the following illustrations.
When inserting a needle, make sure the needle’s flat side is facing the left. Thread the needle always from the right to the left on a Singer Featherweight 221, 222 and 301.
After winding the bobbin, it will need to be placed in a position so that the thread is going counter-clockwise. Place it in the bobbin case this way.
Hook the thread into the slot and back under the tension spring into the slot at the end of the tension spring.
Be sure to leave enough thread hanging from the bobbin case so that the needle thread will catch it.
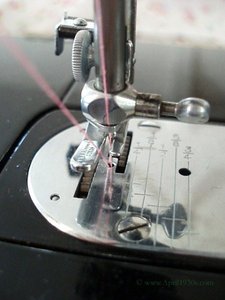
Holding the thread in the left hand, turn the hand wheel towards you with your right hand – lowering the needle and thread, then raising it back up again. You should be able to somewhat feel it catch the bobbin thread below. Pull the thread with your left hand which will bring up the bobbin thread in a loop. Pull the bobbin thread out and let both threads go to the back of the presser foot as shown below.
You are now ready to sew!
Enjoy Sewing on your Singer Featherweight 221 or 222K!


 How to Thread a Singer Featherweight