
%20or%20even%20the%20new%20Narrow%20Zipper%20Foot%20Attachme...)
Zipper Feet Sewing on a Featherweight - Regular or Invisible
For traditional zippers, you can use either the old-fashioned wide Singer Zipper Foot Attachment or the Narrow Zipper Foot Attachment (both shown below) or even the new Narrow Zipper Foot Attachment. I've found that it makes little difference for application, wide or narrow, which foot is used. And, the attachment can do more than just zippers - make your own piping, too!

This foot is labeled the wide Zipper Foot Attachment simply because it has a wider foot.
![]() Low volume strawberry fabric used for sewn sample is from the collection called To Grandmother's House.
Low volume strawberry fabric used for sewn sample is from the collection called To Grandmother's House.


Cut your own bias from a fabric of choice, add an appropriate cording width to the center wrong side, fold it over and begin stitching!

Then you'll use your zipper foot again to apply the piping to your fabric. Place the piping on the seam allowance on the right side and baste in place. Mine happens to be 1/2 inch so the edge of my piping actually coincided with the edge of the fabric, but if your seam allowance was 5/8, your piping might be inset a little bit. (It won't show because it will get stitched within the seam allowance.)
Then stitch the two pieces of fabric together on your seam allowance and the piping will show through to the right side beautifully.

You can see below the zipper and piping sample.

Shop the Invisible Zipper Foot - Adjustable Here
Hidden or Invisible zippers sound so intimidating, don't they? Well, the truth of the matter is they're actually easier to put in than an ordinary zipper, especially with the right tool.
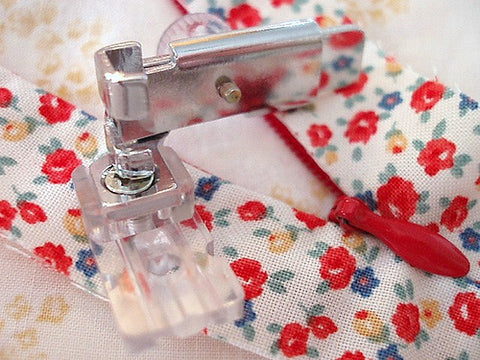
The Featherweight Shop carries the Low Shank Hidden Invisible Zipper Foot Attachment. This style of invisible zipper foot attachment is much-preferred over the oddly shaped plastic pieces found in a little package at sewing stores (they look more like multi-colored mind puzzlers than they do a Sewing Machine Attachment). This low shank invisible zipper foot has a clear or somewhat opaque foot mounted to a metal attachment bracket which has a screw on the backside for adjusting side-to-side depending on where you want your needle.

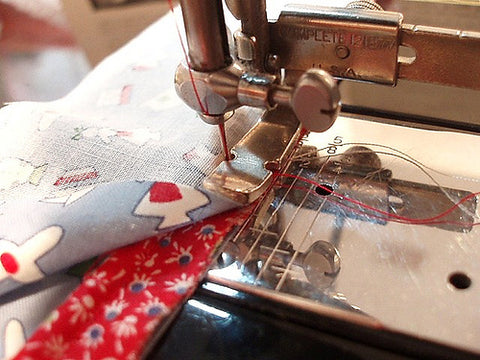
Stitch a basting line on the fabric along the seam allowances helps align the zipper tape correctly. First, press the zipper out flat then with right sides together, allow the teeth to set in the groove opposite the seam allowance edge. Make sure your needle is catching the zipper tape correctly as you stitch.

(Most hidden zippers are accompanied with instructions for inserting it into the seam - now you will have an easy foot to use for application!)

When you need to stitch the bottom section of the zipper tape in place, you can use the outer edge of the attachment.


This woolen coat dress is an example of the invisible zipper used on a School Dress for a young Ruthie!